Custom Patch 3D Foam Embroidery Guide | Foam Thickness, Stereo Effect, Pros & Cons & Design Rules
3D foam embroidery is a classic upgraded craft based on traditional flat embroidery. A layer of soft foam is added between the twill base and embroidery threads. The threads wrap and compress the foam to form natural raised contours, delivering strong three-dimensional sense and tactile texture. It is favored by users who pursue personalized and high-grade visual effects. Yet the foam structure also brings new requirements on pattern size, line width and hollow design. Understanding craft characteristics can avoid collapsed foam, distorted patterns and other defects, and give full play to the advantages of 3D stereo patches.
Custom 3D embroidered patches provides multiple foam thickness options for 3D embroidery, with professional stitching technology to ensure full and long-lasting stereo effect for all styles of custom patches.

Part 1: Production Principle & Standard Foam Thickness
Basic Working Principle
Cut foam material into the same shape as the pattern, attach it to the twill base. High-density embroidery threads cover and fix the foam. The uncompressed part forms a raised 3D surface, while the thread gaps present natural layering.
Three Mainstream Foam Thickness Grades
- 1mm Thin Foam (Soft Mild 3D)
Slight raised effect, soft touch, overall close to flat patch. No bulky feeling.
- Best for: Small logo patches, hat emblems, delicate fashion decorations
- Feature: Retains stereo sense without affecting wearing comfort
- 2mm Medium Foam (Most Popular Universal Grade)
Balanced raised height, obvious three-dimensional effect, moderate hardness. Factory default option for most 3D orders.
- Best for: Tactical morale patches, team emblems, regular size club patches
- Feature: Ideal balance of texture, appearance and durability
- 3mm Thick Foam (Strong Stereo Effect)
High raised profile, prominent layered vision, solid hand feel.
- Best for: Large back patches, motorcycle vest emblems, exhibition souvenir patches
- Note: Slightly bulky, not suitable for slim close-fitting clothing

Part 2: Core Advantages of 3D Foam Embroidery
- Outstanding Stereo Texture: Distinct raised surface, more attractive than flat embroidery from both vision and touch.
- Strong Three-Dimensional Layering: Different pattern heights enrich the overall hierarchy, simple designs also look exquisite.
- Good Anti-Wrinkle Performance: Foam supports the patch structure, not easy to deform or wrinkle after extrusion.
- Rich Visual Impact: Perfect for display on vests, backpacks and outdoor gear, standing out in crowds.
Part 3: Inherent Limitations of 3D Foam Craft
- Unsuitable for Ultra-Fine Details: Too thin lines and tiny text cannot wrap foam fully, leading to collapse.
- Not Ideal for Large Hollow-Out Design: Hollow areas lose foam support, easy to sink and deform.
- Higher Cost Than Flat Embroidery: Extra foam material and complicated stitching process increase unit price.
- Bulky for Slim Apparel: Thick foam will create uneven surface on tight formal clothes.

Part 4: Key Design Rules for 3D Foam Patches
1. Pattern & Element Size Requirements
- Minimum overall size: Not less than 1.8 inches. Ultra-mini patches cannot form complete 3D support.
- Single graphic block: Each raised pattern part should be wider than 3mm to prevent foam collapse.
- Text design: Font height no less than 4mm; avoid slender and hollow fonts.
2. Line & Layout Rules
- Keep connected patterns: Dispersed small isolated patterns lack overall support and sink easily.
- Reduce dense hollow spaces: Simplify complex hollow carvings, retain continuous solid blocks.
- Uniform thread coverage: Ensure threads fully cover foam edges to prevent foam exposure.
3. Shape Matching Suggestions
- Regular round, square and irregular silhouette with smooth outline work best.
- Avoid extremely narrow strip shapes: Narrow parts cannot bear foam and will deform quickly.
Part 5: Craft & Backing Compatibility
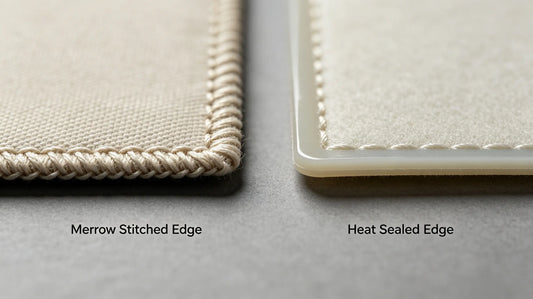
Matching with Edge Finishing
- Double merrow edge is recommended for thick 3D patches to strengthen edge support and anti-fray ability.
- Standard single merrow is enough for 1mm thin foam patches. Raw cut edge is not advised for 3D styles.
Matching with Backing Options
- Sew-on: Fully compatible, the most stable permanent installation for all foam thickness.
- Iron-on: Available for 1mm and 2mm foam; 3mm thick foam has larger gap, weakening adhesive effect.
- Velcro: Full-coverage Velcro is preferred to evenly support the raised patch and avoid tilting.

Part 6: Scenario Selection Guide
Priority to Choose 3D Foam Embroidery
- Motorcycle, biker club large vest patches
- Tactical gear, outdoor camping morale patches
- Team logo, activity souvenir limited patches
- Hat, backpack decorative patches pursuing personality
Better Choose Traditional Flat Embroidery
- Slim formal corporate uniforms and close-fitting shirts
- Ultra-small collar labels and pocket mini emblems
- Low-budget large batch promotional patches
- Designs with massive tiny text and ultra-fine lines
Part 7: Common 3D Foam Design & Custom Mistakes To Avoid
- Make ultra-small text and thin lines on 3D foam → foam collapses, patterns become flat and blurry
- Select 3mm thick foam for slim daily clothing → bulky surface, affect wearing experience
- Design large hollow areas for 3D patches → partial sinking and irreversible deformation
- Use raw cut edge for thick foam patches → edge threads loose and foam exposed after washing
- Choose partial Velcro for large 3D patches → uneven stress, patch tilts easily

Final Summary Core Rule
1mm foam for mild 3D and small patches; 2mm medium foam as universal standard; 3mm thick foam for strong stereo large emblems; keep pattern elements wide enough, avoid ultra-fine details and big hollows; double merrow edge for thick foam, full coverage backing for stable fixation. Match foam thickness and design with usage position to retain perfect 3D effect long-term.
Frequently Asked Questions
Q1: What is the most commonly used foam thickness for 3D patches?
A: 2mm medium foam is the mainstream choice for most standard 3D embroidered patches.
Q2: Can 3D foam patches make very small letters?
A: No, tiny text will cause foam collapse and lose stereo effect. Font height needs to be over 4mm.
Q3: Is 3D foam embroidery more expensive than flat embroidery?
A: Yes, extra foam material and complex stitching lead to slightly higher cost.
Q4: Can thick 3D foam patches use iron-on backing?
A: Not recommended. Thick foam creates gaps and results in poor adhesion.
Tags:
Previous
Custom Patch Merrow Edge Guide | Edge Types, Stitch Styles, Durability & Matching Suggestions
Next
Custom Patch Twill Fabric Guide | Fabric Types, Weight, Color Fastness & Selection Tips