Custom Patch Digitizing Guide | Embroidery Digitizing Rules, File Standards & Common Digitizing Errors
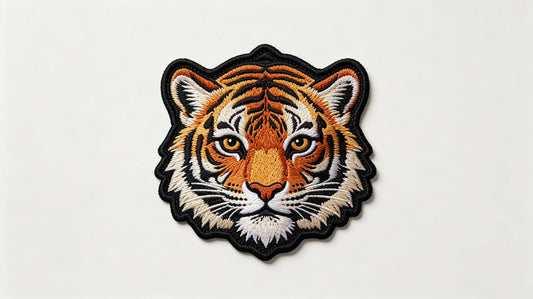
Most customers judge patch quality only by color and size, ignoring the most critical hidden process—embroidery digitizing. Digitizing is the process of translating flat graphic designs into precise machine stitch commands, controlling stitch direction, density, underlay and layering. Poor digitizing results in blurred text, bumpy surfaces, fabric wrinkling, thread gaps and distorted logos, even with correct materials and craftsmanship. Professional standard digitizing is the foundation of high-definition, high-grade custom embroidered patches.
Custom 3D embroidered patches adopts industry premium digitizing standards with optimized stitch density, reasonable underlay setting and professional layering to deliver ultra-clear finished patch effects.

Part 1: What Is Patch Embroidery Digitizing?
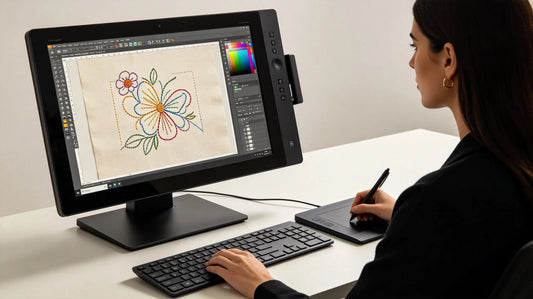
Digitizing is a professional technical process that converts customer artwork (AI, PNG, JPG, PDF) into DST embroidery machine files. Every line, color block, font and pattern is assigned precise stitch types, stitch density, angle direction and layering sequence.
Unlike ordinary image compression, professional digitizing manually adjusts details according to patch size, avoiding machine mechanical errors. It is the core reason why factory finished effects differ drastically from ordinary amateur embroidery works.
Part 2: Industry Standard Digitizing Parameter Rules
1. Standard Stitch Density
- Normal pattern area: 4.0–4.5 stitches per millimeter (balanced full coverage & flat texture)
- Fine text & thin lines: 3.5 stitches per millimeter (prevent line thickening and blurring)
- Large solid color filling: 5.0 stitches per millimeter (ensure no base fabric exposure)
2. Underlay Stitch Setting
Professional patches must add underlay stitching before surface embroidery. The underlay flattens the base fabric, prevents wrinkling, improves three-dimensional sense and avoids sunken uneven surfaces. Cheap amateur digitizing often omits underlay, resulting in low-grade bumpy finished texture.

3. Stitch Direction Consistency
Unified stitch angle for adjacent color blocks ensures uniform light reflection texture; random messy stitch angles cause patch surface mottled color and disordered visual effect.
4. Fine Text Minimum Digitizing Standard
- English font minimum recognizable height: 3mm
- Chinese font minimum recognizable height: 5mm
Excessively small fonts cannot be digitized clearly and need design simplification confirmation.
Part 3: Qualified Artwork File Requirements For Accurate Digitizing
- Best Format: Vector AI, SVG, PDF (infinite zoom, zero blurring, 100% accurate digitizing)
- Acceptable Format: High-resolution transparent PNG (300DPI+)
-
Unacceptable Format: Blurry screenshots, compressed low-resolution JPG, fuzzy web pictures
Low-quality pictures cannot identify tiny details, forcing digitizers to guess patterns and resulting in deformed finished patches.

Part 4: Three Common Low-Quality Digitizing Defects & Causes
1. Blurred Thick Text & Lines
Cause: Excessive stitch density, unreasonable line merging, no fine line independent stitch processing
Performance: Thin fonts stick together, pattern outline loses sharpness, overall fuzzy
2. Bumpy Wrinkled Patch Surface
Cause: Missing underlay stitch, excessive local stitch stacking, unreasonable color layering
Performance: Uneven patch surface, fabric wrinkling, unsmooth texture
3. Sparse Stitch Hole & Fabric Exposure
Cause: Too low stitch density, missing filling stitches, automatic machine default digitizing
Performance: White base fabric exposed, incomplete color coverage, patch looks rough and cheap

Part 5: Professional Digitizing Optimization Benefits
- Ultra-clear tiny text and thin line details restore 1:1 original design
- Flat smooth patch surface without wrinkling or stacking
- Balanced stitch density improves washing durability and anti-fray performance
- Uniform stitch direction enhances overall high-grade texture
- Optimized layering prevents color overlapping and color mixing defects
Part 6: Common Customer Digitizing Misunderstandings
- High-resolution picture = clear patch → Wrong: Pictures need manual stitch conversion, high-res images still require professional digitizing
- Small tiny fonts can be infinitely clear → Wrong: Ultra-small fonts exceed embroidery technical limit and must be simplified
- All factories use the same digitizing standard → Wrong: Premium manual digitizing vs cheap automatic machine digitizing produce huge quality gaps

Final Summary Core Rule
Vector artwork for best digitizing effect; standard stitch density + complete underlay stitching = flat clear patch; fine text follow minimum size limit; avoid auto-digitizing messy stitch defects; professional manual digitizing determines final patch grade.
High-quality digitizing is the invisible core of premium custom embroidered patches.
Frequently Asked Questions
Q1: What file is best for custom patch digitizing?
A: Vector AI, SVG and PDF files provide the most accurate foundation for perfect digitizing results.
Q2: Why do my patch texts look blurry after production?
A: Unprofessional digitizing with excessive stitch density and merged fine lines causes blurred text.
Q3: What is the standard stitch density for high-quality patches?
A: 4.0–4.5 stitches per millimeter is the industry balanced standard for most patterns.
Q4: Can ultra-small tiny fonts be embroidered clearly?
A: Fonts below 3mm English / 5mm Chinese cannot be guaranteed clear and need design simplification.
Tags:
Previous
Sew-On vs Iron-On Patches Ultimate Comparison | Durability, Cost, Installation & Best Use Cases
Next
Custom Patch Die-Cut vs Merrow Edge Guide | Border Differences, Cost, Texture & Best Usage Scenarios