Custom Patch Sew-On Backing Guide | Sewing Tools, Stitch Methods, Thread Selection & Durability Tips
Sew-on patches have no adhesive layer on the back and rely on stitching to fix onto fabrics. Compared with iron-on and Velcro styles, sew-on patches deliver the strongest fixation and longest service life, resisting repeated laundering, pulling and outdoor friction. This makes them the top pick for formal team uniforms, work clothes, school apparel and collectible patches. Whether you use hand sewing for small batches or a machine for mass work, mastering standard stitches and skills ensures both firmness and tidy appearance.
Custom 3D embroidered patches provides standard sew-on backing as default option, suitable for permanent installation on all types of garments and accessories.

Part 1: Essential Sewing Tools & Preparations
Basic Tools
- Sewing needles: Choose medium-thick sharp needles for regular fabric; thick heavy-duty needles for denim and canvas
- Sewing thread: High-strength polyester thread, matching the main color of patch edge or garment
- Scissors: Small sharp scissors for trimming excess thread
- Pins: Temporary fixing pins to hold patches in place before sewing
Pre-Work Steps
- Clean and flatten the target fabric, remove wrinkles to avoid uneven stitching.
- Position the patch accurately and secure it with several pins to prevent shifting during sewing.
- Select thread color: Use matching color for low-key formal style, contrasting color for decorative effect.

Part 2: Three Common Hand Stitch Methods
1. Running Stitch (Simplest & Beginner-Friendly)
Straight in-and-out stitches along the patch edge with equal spacing.
- Features: Easy to learn, fast operation, neat appearance
- Application: Daily casual patches, temporary decoration, light-friction clothing
- Tips: Keep stitch length 3–5mm for balanced firmness and beauty
2. Whip Stitch (High Firmness, Most Popular)
Wrap stitches closely around the patch border, fully locking the edge.
- Features: Excellent anti-fray performance, not easy to loose after long use
- Application: Uniforms, workwear, outdoor gear and frequently washed clothes
- Tips: Stitch spacing should be dense, especially for merrow edge embroidered patches
3. Blanket Stitch (Decorative Style)
Classic ornamental stitch with uniform looped edges.
- Features: Beautiful layered effect, combines firmness and decoration
- Application: Fashion patches, souvenir emblems, bags and craft decorations
- Tips: Keep loop size consistent for a tidy overall look

Part 3: Machine Sewing Method (Efficient for Large Batches)
Standard Operation
- Adjust sewing machine to straight stitch or zigzag stitch mode.
- Set moderate stitch length and thread tension to avoid puckering fabric.
- Sew along the patch outline at a distance of 2–3mm from the edge.
- Reinforce the start and end points with backstitch to prevent thread unraveling.
Suitable Scenarios
Mass uniform production, large batch patch installation, thick denim and canvas materials. Machine stitching is more uniform and labor-saving than hand sewing.
Part 4: Sewing Thread Selection Rules
-
Polyester Sewing Thread (First Choice)High tensile strength, good color fastness, not easy to break or fade after repeated washing. Compatible with all patch types and fabrics, universal for daily use.
-
Cotton ThreadSoft texture, natural luster, but poor wear resistance. Only recommended for indoor decorative patches with low friction.
-
Thick Heavy-Duty ThreadFor extra thick fabrics like jeans, tactical gear and heavy work uniforms. Enhance pulling resistance for long-term use.

Part 5: Craft-Specific Sewing Notes
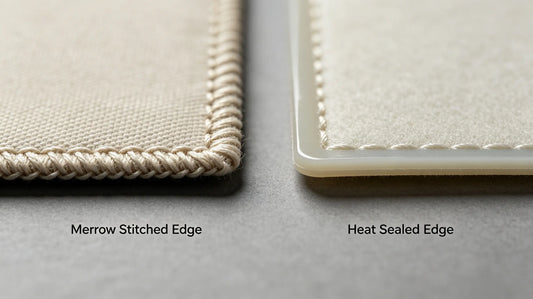
Embroidered & Merrow Edge Patches
Sew along the outer side of the merrow border, do not pierce dense embroidery areas to avoid damaging threads. Reinforce four corners specially, as corners are the most likely to wear loose.
3D Foam Embroidery Patches
Control needle penetration depth, avoid pressing the foam layer flat. Use flexible stitches to retain the 3D stereo effect.
Woven Patches
Ultra-thin body, use fine needle and thin thread. Reduce stitch density properly to prevent the base fabric from wrinkling.
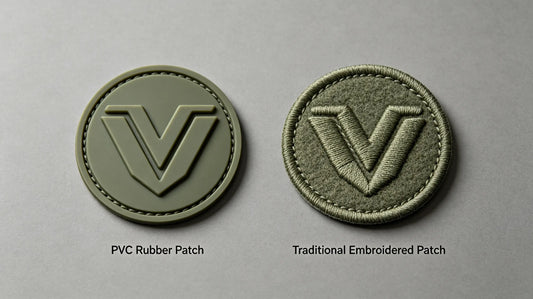
PVC Rubber Patches
Use sharp thick needles to pierce rubber smoothly. Do not pull the thread too tight to avoid patch deformation.
Part 6: Durability Enhancement & Maintenance Tips
- Double stitch along edges for patches on high-friction positions such as elbows and shoulders.
- Trim excess thread ends timely to prevent tangling and unraveling.
- When washing sewn patches, follow regular garment care rules; avoid strong pulling on patch edges.
- For old patches with loose local stitches, repair and re-sew the problematic area promptly to prevent further spreading.

Part 7: Common Sewing Mistakes To Avoid
- Oversized stitch spacing → insufficient fixation, edges lift easily after washing
- Use fragile cotton thread for work uniforms → thread breaks quickly under frequent friction
- Sew directly on dense embroidery areas → damage original embroidery threads and affect appearance
- Omit backstitch at start and end → whole line of thread unravels gradually
- Pull thread too tight during sewing → fabric shrinks and wrinkles severely
Final Summary Core Rule
Sew-on backing = permanent most durable installation; running stitch for beginners, whip stitch for firmness, blanket stitch for decoration; polyester thread as standard; sew along patch border, reinforce corners and start/end points; adjust needle and stitch for different patch crafts. Standard sewing keeps patches fixed firmly for years of use.
Frequently Asked Questions
Q1: Which stitch is the firmest for sewing patches?
A: Whip stitch provides the strongest fixation for long-term use and frequent washing.
Q2: What kind of thread is best for sewing wearable patches?
A: High-strength polyester thread is the most durable and recommended option.
Q3: Can I use a regular household sewing machine to attach patches?
A: Yes, a standard sewing machine works well for fast and uniform edge stitching.
Q4: Where should I sew along an embroidered patch?
A: Sew along the outer edge of the merrow border instead of the embroidered area.
Tags:
Previous
Custom Patch Iron On Backing Guide | Heat Transfer Rules, Temperature, Time & Re-Adhesion Tips
Next
Custom Patch Merrow Edge Guide | Edge Types, Stitch Styles, Durability & Matching Suggestions