Custom Patch Iron On Backing Guide | Heat Transfer Rules, Temperature, Time & Re-Adhesion Tips
Iron-on patches rely on hot melt adhesive on the reverse side to bond with fabrics, featuring easy operation and no need for professional sewing skills. It is favored by families, students and casual users for decorating clothes, bags and accessories. Many installation failures happen because users do not master accurate temperature, pressure and time parameters. Different fabrics also have different heat resistance limits, which must be distinguished to avoid burning fabrics or damaging patches. Mastering standard operation and maintenance skills can make iron-on patches stay firmly attached for a long time.
Custom 3D embroidered patches uses high-quality low-temperature hot melt glue for iron-on backing, compatible with most daily fabrics and easy for home installation.

Part 1: Working Principle & Basic Parameter Standard
Iron-on patches are coated with solid hot melt glue on the back. The glue melts under specific heat, penetrates fabric fibers, and solidifies again after cooling to form a stable bond.
Universal Standard Parameters
- Recommended temperature: 130°C – 150°C (medium heat)
- Pressing time: 10 – 20 seconds for small patches, 20 – 30 seconds for medium & large patches
- Pressure: Apply steady and even force, do not drag the iron back and forth
- Cooling time: Let it cool naturally for 5 – 10 minutes before use or washing
Part 2: Step-by-Step Standard Installation Process
- Preparations: Clean and flatten the target fabric, remove wrinkles, dust and oil stains. Lay the garment on a flat hard table, avoid soft beds or sofas.
- Positioning: Place the iron-on patch on the desired position, confirm the angle and layout, and fix it temporarily.
- Isolation protection: Cover the patch with a thin cotton cloth or parchment paper to prevent direct high temperature from scorching threads or rubber surface.
- Heating and pressing: Adjust the iron to medium heat, turn off steam function completely. Press firmly on the patch without moving sideways, follow the standard time for heating.
- Edge reinforcement: Focus on pressing the four corners and outline edges for extra 3 – 5 seconds, as edges are the most prone to peeling.
- Natural cooling: Do not move or bend the fabric immediately. Wait until it is fully cooled to complete the bonding.

Part 3: Fabric Compatibility & Temperature Adjustment
Fully Applicable Fabrics (Best Effect)
- Cotton, denim, canvas, thick polyester: Good heat resistance, use standard 130°C – 150°C parameters, most stable adhesion.
Medium Heat-Sensitive Fabrics
- Mixed fabric, thick sportswear fabric: Lower temperature to 120°C – 130°C, extend pressing time appropriately, avoid overheating.
Not Recommended for Iron-On Installation
- Nylon, spandex, thin silk, lace: Low heat resistance, easy to melt, deform or leave marks under high temperature. Choose sew-on backing instead.
- Waterproof coated fabric: The coating will block hot melt glue penetration, resulting in permanent weak adhesion.
- Loose knitted fabric: Large gaps between fibers, glue cannot form effective bonding.

Part 4: Craft-Specific Iron-On Notes
Embroidered Patches
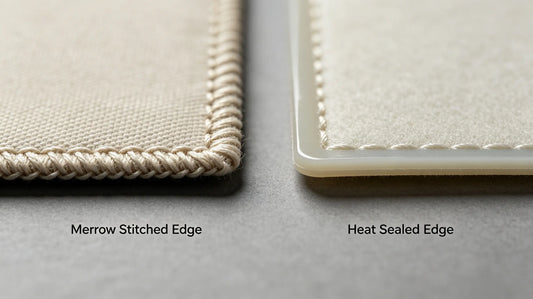
Standard parameters apply. Do not use excessive high heat to prevent thread discoloration. Reinforce merrow edges specially.
3D Foam Embroidery Patches
Control temperature strictly below 150°C. Overheating will melt and collapse the foam layer, destroying 3D effect. Increase pressure properly but shorten single pressing time.
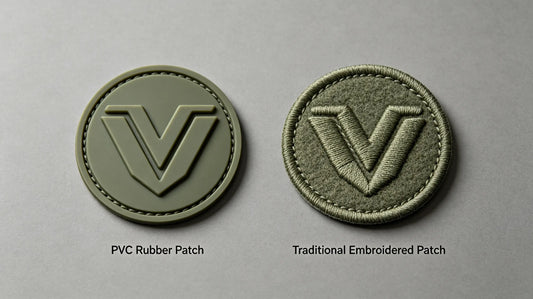
PVC Rubber Patches
Must use protective cloth, temperature cannot exceed 140°C. High temperature will deform rubber and blur patterns.
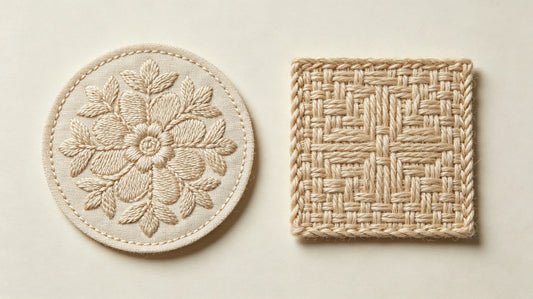
Woven Patches
Ultra-thin design, use medium-low heat, avoid long-time single-point pressing to prevent fabric shrinkage.
Part 5: Solutions for Common Problems
1. Patch edges lift after installation
Cause: Insufficient pressure, short heating time or edges not reinforced.
Solution: Cover with cloth and re-press the loose areas for 10 – 15 seconds, then cool completely.
2. Patch falls off entirely after washing
Cause: Fabric has oil stains, steam was used during ironing, or incompatible fabric.
Solution: Clean the position thoroughly, re-iron following standard steps; replace with sew-on backing if fabric is not heat-resistant.
3. Glue seeps out from patch edges
Cause: Temperature too high or pressing force too heavy.
Solution: Wipe excess glue while warm, use lower temperature for next application.

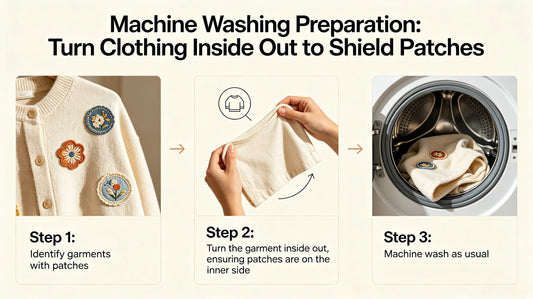
Part 6: Daily Use & Washing Tips for Iron-On Patches
- First 48 hours after installation: Avoid washing, stretching or strong pulling, let the glue bond fully.
- Washing rules: Turn clothes inside out, use cold water and gentle cycle. Do not use strong detergent or bleach.
- Drying: Natural air dry is preferred. Do not use high-temperature dryer.
- Repeated repair: If local peeling occurs after long use, re-iron with protective cloth to reactivate the glue.
Part 7: Common Iron-On Mistakes To Avoid
- Keep steam function turned on during ironing → water vapor dilutes hot melt glue, leading to poor adhesion
- Use soft cushion surface for ironing → uneven pressure causes incomplete bonding
- Apply ultra-high temperature to speed up operation → burn fabric, discolor threads or deform PVC
- Remove and use immediately after ironing → glue not fully solidified, edges peel easily
- Apply iron-on patches on silk, nylon and waterproof fabric → basically cannot bond firmly

Final Summary Core Rule
Medium heat 130-150°C, turn off steam, use cotton protective cloth; steady pressing without dragging, reinforce edges; cotton/denim work best, avoid silk and waterproof fabric; cool fully after ironing; re-press to fix lifted edges. Follow standard steps to make iron-on patches durable and stable.
Frequently Asked Questions
Q1: Do I need to turn off steam when applying iron-on patches?
A: Yes, steam will weaken hot melt glue and cause poor adhesion.
Q2: What temperature is suitable for most iron-on patches?
A: Medium heat between 130°C and 150°C is the standard choice.
Q3: Can iron-on patches be used on silk clothes?
A: Not recommended. Silk is heat-sensitive and easy to be damaged by ironing.
Q4: What to do if the patch edge lifts after washing?
A: Cover with a cloth and re-iron the loose part to reactivate the adhesive.
Tags:
Previous
Custom Patch Velcro Backing Guide | Hook & Loop Types, Strength, Installation & Replacement Tips
Next
Custom Patch Sew-On Backing Guide | Sewing Tools, Stitch Methods, Thread Selection & Durability Tips