Custom Patch Iron-On Backing Guide | Application Steps, Temperature Control & Troubleshooting
Iron-on patches use hot melt adhesive on the backing, which melts under heat and bonds tightly with fabric. It saves sewing work and keeps the patch flat without raised stitches. This method is widely used on casual clothes, jeans, backpacks and uniforms. However, many users encounter problems like easy peeling, warped edges and incomplete adhesion. The core reasons are unsuitable temperature, insufficient pressing time, dirty sticking surface or mismatched fabric. Master standard operation rules can greatly improve the bonding effect.
Custom 3D embroidered patches adopts high-quality durable hot melt glue for iron-on backing, matching different fabrics and providing detailed application guidance.

Part 1: Working Principle & Basic Advantages
Iron-on patches are coated with solid hot melt glue on the reverse side. When heated to the melting point, the glue becomes viscous and penetrates fabric fibers. After cooling down, it solidifies again to form a permanent bond.
- Advantages: No sewing needed, simple operation, flat and neat surface, low bulkiness
- Applicable scenarios: Daily clothing, denim, canvas bags, cotton uniforms
- Limitations: Not suitable for high-elastic fabrics, waterproof coated fabrics and heat-sensitive materials
Part 2: Pre-Application Preparation Work
-
Clean the surface
Wipe off dust, oil and lint on the target fabric. Dirty surface will isolate glue and cause poor adhesion.
-
Smooth the fabric
Lay clothes flat on a hard heat-resistant table or ironing board, remove all wrinkles. Uneven fabric leads to incomplete contact.
-
Position confirmation
Place the patch at the desired position, adjust angle and spacing, confirm the final layout before heating.
-
Prepare isolation cloth
Get a thin cotton cloth or plain handkerchief ready to avoid direct high temperature damaging embroidery threads and colors.
-
Check iron status
Remove water from the iron, turn off steam mode. Steam will dilute hot melt glue and cause failure.

Part 3: Standard Application Steps (Universal Process)
- Turn off steam function of the iron completely, adjust to the corresponding temperature gear.
- Cover the patch fully with the prepared cotton isolation cloth.
- Press the iron firmly on top, keep static pressure instead of dragging back and forth.
- Hold for 10–20 seconds for each area, heat the whole patch evenly.
- Focus on edges and corners, which are the most prone to curling, extend pressing time properly.
- After ironing, let it cool naturally for 10–15 minutes. Do not move or test adhesion while hot.
- After full cooling, gently pull the edge to check firmness; re-iron weak areas if needed.
Part 4: Temperature Settings By Fabric Type
1. Cotton & Linen Fabric (Most Common)
- Temperature: 140°C – 160°C (Cotton gear on iron)
- Pressing time: 15–20 seconds per area
- Feature: High heat resistance, highest success rate for iron-on patches
2. Denim & Thick Canvas
- Temperature: 150°C – 165°C
- Pressing time: 20–25 seconds
- Note: Thick fabric needs longer heating to transfer heat to the glue layer
3. Polyester & Blended Fabric
- Temperature: 120°C – 130°C (Low-medium heat)
- Pressing time: 10–15 seconds
- Note: Avoid overheating to prevent fabric shrinkage and melting
4. Wool & Wool Blends
- Temperature: Below 120°C (Low heat)
- Pressing time: 10 seconds, multiple short press instead of long heating
- Note: Wool is easy to scorch, strictly control temperature and time
5. Prohibited Fabrics (Not Recommended for Iron-On)
Silk, spandex elastic fabric, waterproof coated fabric, vinyl and plastic materials. High temperature will damage the material and cannot form effective adhesion.

Part 5: Special Patch Types Operation Notes
Flat Embroidered Patches
Follow universal steps, standard temperature and time are enough for stable bonding.
3D Foam Embroidery Patches
- Lower temperature appropriately, avoid long-time concentrated heating
- Do not press too hard to prevent foam layer collapse
- Extend natural cooling time after ironing
Woven Patches
Thin texture, use medium-low heat, prevent fabric shrinkage and pattern distortion.
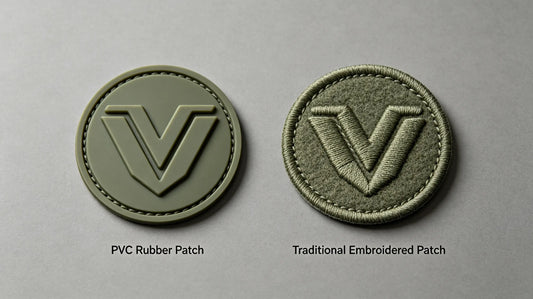
PVC Rubber Patches
Strictly use low heat, short pressing time. High temperature will deform and melt PVC material.
Part 6: Common Failures & Targeted Solutions
1. Patch does not stick at all after ironing
- Causes: Steam not turned off, temperature too low, pressing time insufficient
- Solution: Drain iron water, raise temperature, re-iron with longer static pressure
2. Patch surface discoloration or thread melting
- Causes: Temperature too high, no isolation cloth, iron dragged repeatedly
- Solution: Lower heat, always use cotton cloth, keep static pressing
3. Edges curl up easily after cooling
- Causes: Insufficient heating on corners, fabric uneven
- Solution: Focus extra pressing on four edges, re-flatten and re-heat the curled part
4. Patch peels off after washing several times
- Causes: Glue did not fully penetrate fibers, rushed to use before complete cooling
- Solution: Re-iron the whole patch again, wait fully cooled before wearing and washing
5. Partial adhesion, middle lifting
- Causes: Uneven pressure, foreign matter between patch and fabric
- Solution: Re-clean the surface, apply even pressure during re-ironing

Part 7: Post-Application Daily Maintenance Rules
- Wait at least 24 hours before the first wash after ironing, let glue solidify completely.
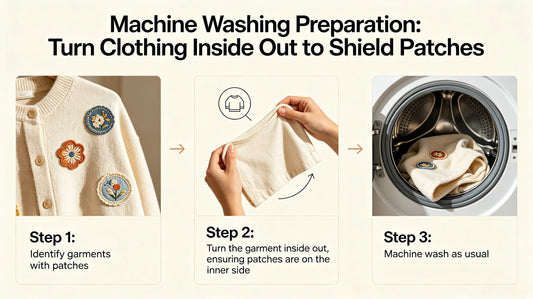
- Turn clothes inside out when washing, reduce friction on the patch surface.
- Use cold or lukewarm water, avoid high-temperature washing and drying.
- Do not use strong detergent and bleach, which will accelerate glue aging.
- If slight edge lifting appears in later use, cover with cloth and re-iron for repair.
Part 8: Common Operation Mistakes To Avoid
- Use steam iron during application → steam dilutes hot melt glue and leads to adhesion failure
- Drag iron back and forth instead of static pressing → uneven heating, loose bonding
- Skip isolation cloth and iron directly → burn threads, fade colors and damage surface
- Test adhesion while the patch is still hot → pull apart the uncured glue easily
- Apply iron-on patches on silk, elastic or waterproof fabric → permanent damage and no adhesion

Final Summary Core Rule
Turn off steam before use, match temperature by fabric, use cotton cloth for isolation; keep static pressing, focus on edges, wait full cooling before use. Avoid heat-sensitive fabrics; re-iron to fix curling and peeling. Standard operation ensures iron-on patches stay firmly attached long-term.
Frequently Asked Questions
Q1: Can I use steam iron to apply iron-on patches?
A: No, you must turn off steam completely, otherwise the glue will fail to stick.
Q2: How long should I wait before washing after ironing a patch?
A: It is best to wait 24 hours to ensure the hot melt glue is fully cured.
Q3: What to do if the patch edges curl up after application?
A: Cover with cloth and re-press the edges with proper heat and pressure.
Q4: Are iron-on patches suitable for elastic spandex clothes?
A: Not recommended. Elastic fabric easily causes the backing to peel off.
Tags:
Previous
Custom Patch Velcro Backing Guide | Types, Strength, Installation & Replacement Tips
Next
Custom Patch Sew-On Guide | Hand Sewing, Machine Sewing, Stitch Types & Professional Tips