Custom Patch Self-Adhesive Backing Guide | Usage, Durability, Removing Residue & Suitable Application
Self-adhesive peel-and-stick backing eliminates sewing equipment and high-temperature ironing, enabling instant patch installation within seconds, which makes it a top pick for temporary DIY decoration and one-time promotional labeling. However, the glue layer has inherent material limitations: uneven porous surfaces, frequent washing and long-term outdoor exposure drastically shorten adhesive lifespan, triggering early peeling and sticky residual traces. Distinguishing proper applicable substrates and mastering standard sticking operation can effectively extend patch adhesion time and avoid costly surface residue damage.
Custom 3D embroidered patches offers standard and upgraded heavy-duty self-adhesive backing options alongside free application guidance to match the right sticky grade per your usage environment.

Part 1: Two Main Self-Adhesive Patch Glue Grade Specifications
1. Standard General Purpose Self-Adhesive (Default Option)
Water-based environmental glue, moderate stickiness, ideal for indoor short-term use ranging from 1–3 months.
- Advantages: Easy residue-free peeling within 30 days, non-corrosive for most smooth surfaces, affordable upgrade cost
- Disadvantages: Poor water resistance, falls off quickly after repeated dampness or laundry
- Best for: Paper packaging, cardboard, notebooks, short-term event temporary decoration
2. Heavy-Duty Permanent Self-Adhesive (Premium Upgrade)
Oil-based high-viscosity industrial adhesive, strong bonding lasting 6–12 months under dry indoor conditions.
- Advantages: Anti-slight moisture, high peel resistance, stable adhesion on semi-rough materials
- Disadvantages: Hard to remove cleanly after long-term attachment, easy to leave glue residue on delicate fabrics
- Best for: Leather goods, hard plastic accessories, long-term fixed non-washable ornamentation

Part 2: Approved Surfaces vs Unusable Surfaces For Sticky Patches
Perfect Compatible Surfaces
Smooth leather, hard plastic, cardboard, coated paper, finished PU, sealed synthetic fabric, polished wood; tight non-porous texture locks glue layer steadily to avoid early shedding.
Never Recommended Surfaces
Unfinished coarse cotton, loose open-weave textile, fuzzy fleece, unprocessed porous wood, damp sweaty garment areas; large fabric gaps absorb glue and weaken bonding force rapidly.
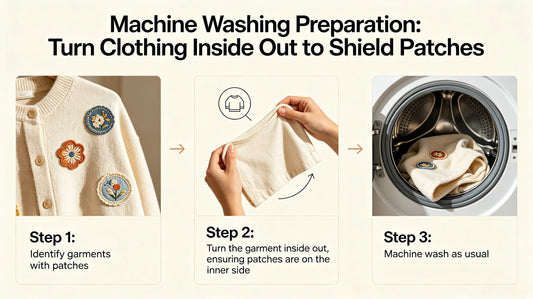
Part 3: Standard 4-Step Correct Self-Adhesive Installation Process
- Full surface cleaning: Wipe target spot to remove dust, grease, sweat and residual detergent; dirt is the primary reason for insufficient sticking.
- Complete dry waiting: Ensure surface fully air-dried before applying patches, any hidden moisture ruins adhesive performance.
- Even liner peel: Gradually tear off protective paper liner without touching glue layer by finger (skin oil contaminates adhesive).
- Firm pressure compaction: Press patch evenly from center outward for 15–30 seconds to exhaust air bubbles between patch and substrate for full contact.

Part 4: Safe Residue Removal Methods For Different Materials
- Smooth hard surface (plastic/leather): Warm damp cloth with mild soap soak residue for 3 minutes then wipe away leftover glue.
- Regular cotton fabric: Apply small amount of rubbing alcohol on cotton swab to dissolve adhesive, test on hidden corner first to prevent discoloration.
- Delicate high-end textiles: Low-temperature hair dryer heat residual glue slightly then slowly peel off softened adhesive block.
Part 5: Suitable & Unsuitable Usage Scenarios Summary
Ideal Self-Adhesive Application
Gift box branding, craft scrapbooking, stationery decoration, short-term festival costume embellishment, product packaging labeling, indoor fixed non-wash decor.
Switch To Sew/Iron/Velcro Instead
Daily wearable uniforms needing regular washing, outdoor rain-exposed gear, high-friction sports apparel, permanent long-term garment emblems.

Part 6: Common Self-Adhesive Patch Application Mistakes To Avoid
- Sticking directly on dusty sweaty fabric without cleaning → patch detaches within several days
- Using permanent heavy adhesive on disposable thin apparel → severe stubborn residue after removal
- Exposing self-adhesive patched items to regular water soaking → rapid glue invalidation and peeling
- Touching sticky glue surface with bare hands during installation → oil contamination reduces overall adhesion
Final Summary Core Rule
Short-term indoor dry use = standard self-adhesive; long-term fixed non-wash decor = heavy-duty permanent glue; smooth sealed surfaces work best, rough porous fabric rejects sticky backing; clean+dry+press firmly for installation; heat/alcohol safely clean leftover residue; washable daily clothes select sew/iron backing instead.
Proper backing matching eliminates peeling troubles and messy glue stains.

Frequently Asked Questions
Q1: Can self-adhesive patches withstand regular garment washing?
A: Most standard sticky patches cannot survive laundry cycles; they will peel after water immersion.
Q2: How to safely remove glue residue left by old self-adhesive patches?
A: Use warm soapy cloth for hard surfaces or mild rubbing alcohol for regular fabrics after hidden spot testing.
Q3: What surface is not fit for peel-and-stick custom patches?
A: Loose fuzzy rough open-weave fabrics and unfinished porous materials are unsuitable for self-adhesive backing.
Q4: What is the service lifespan of heavy-duty permanent self-adhesive patches?
A: Around 6–12 months under dry stable indoor environment without water or frequent friction.
Tags:
Previous
Custom Patch Velcro Backing Guide | Loop & Hook Type, Strength, Replacement & Tactical Usage
Next
Custom Patch Iron On Backing Guide | Application Steps, Heat Settings, Wash Durability & Common Fail Fixes