Custom Patch Size Guide | Standard Dimensions, Size Selection Rules & Design Adaptation Tips
Choosing the right size is the first step to a successful custom patch. Different wearing positions have fixed space limits, while complex patterns, text and logos also put forward clear requirements on minimum dimensions. A patch that is too small will compress details and make text unrecognizable; an excessively large patch will look bloated and affect the comfort of clothing and accessories. Mastering industry standard sizes and matching logic for different scenarios can effectively avoid dimension errors and rework, and maximize the display effect of patterns.
Custom 3D embroidered patches provides free size consultation and layout optimization for all custom orders, helping clients select reasonable dimensions and adjust designs to match patch sizes perfectly.

Part 1: Industry Mainstream Standard Patch Dimensions & Application Scenarios
1. Mini Size (1" – 2.5 inches)
The most common size for compact positions, lightweight and unobtrusive.
- Typical dimensions: 1.5", 2", 2.5" round/ square/ irregular shape
- Best use: Baseball cap front/side logos, garment collar marks, pocket mini emblems, wallet and keychain decorations
- Design note: Simplify content as much as possible; keep single logo or short text only
2. Medium Size (2.5" – 4 inches)
Universal golden size, balanced visual effect and wide adaptability.
- Typical dimensions: 3", 3.5", 4"
- Best use: Corporate & team uniform chest patches, backpack side decorations, daily casual clothing emblems
- Design note: Supports combined patterns + short slogan text, most cost-effective size for bulk orders
3. Large Size (4" – 7 inches)
Strong visual impact, suitable for prominent display areas.
- Typical dimensions: 5", 6", 7"
- Best use: Tactical vest arm patches, jacket back small logos, travel luggage large marks
- Design note: Can carry complex patterns and multi-line text without crowding
4. Extra Large Size (Over 7 inches)
Custom oversized specification for exclusive large-area decoration.
- Typical dimensions: 8" – 12" and above
- Best use: Motorcycle vest full back patches, outdoor banner decorations, large canvas bag main patterns
- Design note: Suitable for full composition, complex totems and large-area graphic design

Part 2: Shape & Size Matching Suggestions
- Round Patches: 1.5" – 3.5" is the mainstream range; too large round patches lack coordination on clothing
- Square/Rectangle Patches: Flexible size range, from mini labels to large back patches are all applicable
- Irregular Custom Shapes: Refer to the longest side for size standard; control the overall outline not to be too out of proportion
Part 3: Size Matching Rules For Different Design Content
1. Design with Text Elements
- Single short word: Minimum 1.2 inches to ensure clear embroidery
- Multi-line slogan/ paragraph text: Minimum 3 inches; below this size will cause overlapping and blurry letters
- Tiny signature & fine print: Not recommended for patches under 2 inches, choose woven craft preferentially
2. Design with Complex Patterns
- Simple logo & icon: Adaptable for 2" and above sizes
- Complex totem, portrait and multi-layer graphics: Minimum 4 inches, reserved enough space for detail presentation
3. 3D Foam Embroidery Patches
Not suitable for ultra-mini size below 1.8 inches; foam layer is easy to collapse due to insufficient support. Recommended starting size: 2.5 inches and above.

Part 4: Size Selection By Installation Position
- Hat Front Panel: Limit within 2.5 inches; oversized patches will squeeze the cap surface and affect wearing
- Uniform Chest Area: 2.5" – 3.5 inches is the standard industry size, neat and formal
- Jacket & Vest Back: Can choose 7" and above extra large size for eye-catching effect
- Sleeve & Shoulder Position: 3" – 5 inches, avoid excessive size restricting arm movement
- Collar & Inner Label: Strictly below 2 inches, ultra-thin woven patch is the optimal choice
Part 5: Design Adaptation Skills After Size Confirmation
- Determine the core visual first: Keep brand logo and key patterns in the central area, and remove redundant trivial details for small patches
- Adjust line thickness: Appropriately thicken lines for small-size embroidery to prevent thread fusion; thin lines properly for large patches to avoid clumsy vision
- Text layout optimization: Use compact arrangement for small patches and sparse typesetting for large patches to improve readability
- Reserve edge space: Leave 0.2 – 0.3 inches blank near merrow edge, prevent core content from being covered by border stitching

Part 6: Common Size Selection Mistakes To Avoid
- Arrange multi-line long text on patches under 2 inches → letters squeeze together and become completely unreadable
- Use extra large patches on hat front → destroy cap shape and affect daily wearing
- Custom complex detailed patterns on mini patches → details lost after embroidery, finished product looks messy
- Choose undersized dimension for 3D foam patches → foam layer deforms and loses three-dimensional effect
- Blindly pursue large size for formal uniform chest emblem → bloated and lose professional formal sense
Final Summary Core Rule
1"–2.5" mini for hats & collars; 2.5"–4" medium as universal standard for chest uniforms; 4"+ large for back and luggage; text & complex patterns need larger size; caps limit size within 2.5"; simplify details for small patches, enrich layout for large ones. Match dimension with position and content to get ideal patch effect.
Scientific size selection is the foundation of clear and beautiful custom patches.

Frequently Asked Questions
Q1: What is the most popular size for uniform chest patches?
A: 2.5 to 4 inches is the standard and most widely used size for uniform chest emblems.
Q2: What is the maximum suitable size for a cap front patch?
A: It is recommended not to exceed 2.5 inches to keep the cap in good shape.
Q3: Can multi-line text be made on 2-inch small patches?
A: Not recommended. Multi-line text will become crowded and blurry in such limited space.
Q4: What size is suitable for large back patches on vests?
A: 7 inches and above extra large size is commonly used for vest back decorative patches.
Tags:
Previous
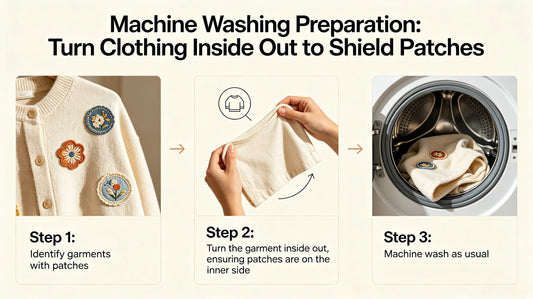
Custom Patch Care & Washing Guide | Laundry Rules, Drying, Ironing & Long-Term Maintenance Tips
Next
Custom Patch Artwork Guide | File Format, Resolution, Line Thickness & Design Submission Rules